

Save money and creatively tackle your gift list this year with our ideas for one-of-a-kind gifts you can create for the people in your life.
Sheryl Hawkins’ White Chocolate Peanut Butter Krispies Candy

INGREDIENTS
- 2 cups Rice Krispies Cereal
- 12 oz. dry roasted peanuts
- 2 cups mini marshmallows
- 2 cups creamy peanut butter
- 1 cup white almond bark
INSTRUCTIONS
- Combine cereal, peanuts and marshmallows in a large bowl. Set aside.
- In a pan melt white almond bark and peanut butter over low heat, stirring constantly.
- Add white chocolate and peanut butter mix to the cereal mixture and mix well.
- Drop by tablespoons onto waxed paper and let set. Refrigerate for 1 hour. Store in airtight container.
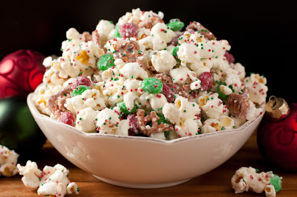
Sheryl Hawkins’ Christmas Crunch {Funfetti Popcorn Christmas Style}
Adapted from Bake at 350
INGREDIENTS
- 1/2 cup popping popcorn kernels or 2 bags tender white popcorn
- 12 oz bag vanilla candy melts, such as Wilton’s
- 1 and 1/3 cups broken pretzel pieces
- 12 oz green and red milk chocolate or mint M&Ms
- Red, green and white sprinkles
DIRECTIONS
Using a popcorn popper, pop the corn into a large bowl according to manufacturer’s directions or see this recipe for Perfecto Popcorn.
(You can also use plain microwave popcorn.) Remove any unpopped popcorn kernels, then add broken pretzel pieces and M&Ms and toss.
Melt candy melts in a microwave safe bowl on 50% power in 30 second intervals, stirring after each interval, until melted and smooth. Drizzle half of melted chips over popcorn mixture then stir, tossing gently a few times with a rubber spatula. Drizzle the remaining half of melted the chips over popcorn and gently stir mixture until evenly coated. (Be careful not to over-stir, since the sprinkles won’t stick if the white chips begin to set and harden).
Pour mixture into a single layer onto wax paper. Sprinkle entire mixture evenly with sprinkles (as many as you’d like) before vanilla chips set. Allow to cool and harden, then gently break into pieces and store in an airtight container.
TIPS AND VARIATIONS
- Add as many sprinkles as you like why not try different shapes and colors (Jingle Mix Nonpareils)
- You could also try different flavored candy melts such as mint or peppermint
- You don’t have to stick with M&M’s, why not try different festive sweets such as mini candy canes or marshmallows
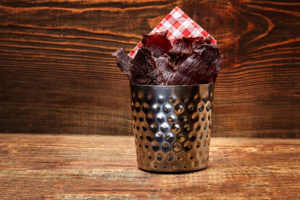
Shirley Bedingfield’s Beef Jerky
 INGREDIENTS
- 5 lbs. “jerky meat” from Perry’s Meat Market on Lewis (bull round sliced thin for $5.29/lb.)
- 1:3 ratio diluted Fort Worth Stockyards Natural Hickory Liquid Smoke
- 1 bottle Accent Meat Tenderizer
- 1 bottle Lemon Pepper
- 2 tsp Black Pepper
- 1 cup salt
- 1 TB cayenne pepper
DIRECTIONS
Mix together in a big roasting pan and marinate in refrigerator for at least 12 hours. Place in dehydrator 5 – 8 hours.
If you don’t have a dehydrator, no worries!! You can make it in the oven! All you need is some foil and toothpicks or bamboo skewers.
Arrange your oven racks with one rack on the very top, and one on the next-to-lowest setting. Spread a piece of foil over the bottom rack, folding the edges up just a bit to make a disposable baking sheet.
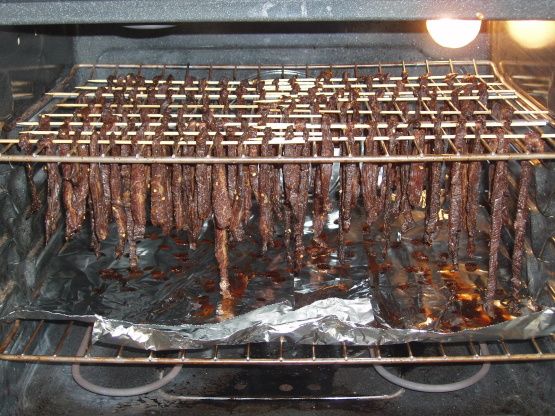
One at a time, take each piece of meat, poke a toothpick through one end, and hang on the top rack, with the meat hanging down between the bars, and the toothpick laying across the bars. It’ll drip on the foil, not on your oven!
Set your oven as low as it will go, about 160-170 degrees. Keep your oven cracked open by sticking a wooden spoon in the door. Dry your jerky in the oven for 5-7 hours. Start checking at 5 hours. You want the jerky to feel like rubber, kind of firm and bendy, not soft and squishy, but not dark and crackly. No grey spots. It may take a few tries to get it perfect. You can even remove jerky at different times to see how “done” you like yours. It will dry a bit more once you remove it from the oven. Take the toothpicks out and immediately put your jerky in a ziploc bag. This will keep it from drying out.
Steva Cottingim’s Spiced Tea
 Mix the following together:
- ¾ cup instant tea
- 12 oz. Tang (1½ cup)
- 12 oz. Powdered Lemonade mix
- 2 cups sugar
- 1 t. brown cloves
- 1 t. cinnamon
- 1 cup cinnamon candies “red hots”
Add 2 – 4 tsp. to one cup of hot water and enjoy on a cold winter’s night!!!!!
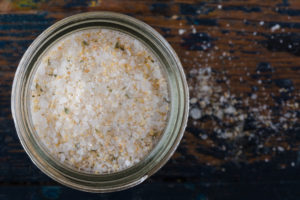
Steva Cottingim’s Infused Salt
To make these punchy infused salts, just start with kosher salt, sea salt or flake salt and a clean, completely dry airtight jar. I would err on the smaller side for salts. Then you just add the herb (I prefer fresh) or spice (I use dry ground spices) to the salt—the drier it is, the less the salt will clump.
The best ratio for infused salt seems to be about 1 teaspoon spice or dried herbs to 1/4 cup kosher salt. With something fresh like citrus zest or fresh herbs, you can be more generous – and I love being a bit more generous with my herbs.
Here are some of my favorite varieties of infused salt and how I would use them:
ROSEMARY-LEMON SEA SALT
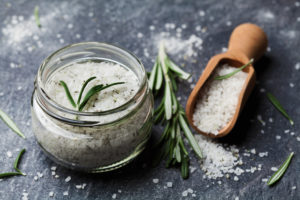
INGREDIENTS
- 1 cupcoarse sea salt
- 3tablespoons fresh rosemary leaves finely chopped
- Zest of 1 lemongrated
INSTRUCTIONS
- Preheat the oven to 110 degrees C (230 degrees F).
- Zest the lemon and finely chop the rosemary (leaves only, discard the stem). You may also use ground rosemary.
- Add the sea salt, rosemary and lemon zest to a food processor. Pulse until the salt becomes a little finer and everything is well mixed. I usually don’t grind my salt – just mix it because I love cooking with the coarser salt.
- Taste and increase the amount of flavorings, if desired.
- Transfer the mixture to a baking sheet and bake for 15-20 minutes. (If you use dried ground rosemary, and no lemon, you will not need to bake. Just put it in your jar.)
- Remove it from the oven and, if there are any lumps, pulse it in the food processor again.
- Let it cool for 5 minutes and store the rosemary-lemon sea salt in an airtight container or in a glass jar with a tight-fitting lid.
- Ideally, let it sit at least a day before using.
- The intensity of flavor will diminish over time, but it can last up to a year
*I sometimes add other herbs that blend well with rosemary, like sage and garlic for a favorite blend. Thyme and Oregano also work well. Just roughly chop the herbs together, even air dry for most of the day, or dry quicker in a warm oven and mix with salt. Store in a pretty jar or bottle.
A great seasoning for roasted veggies or Italian dishes that include pasta and sausage. I also use this in soups and sauces and chicken or beef.
GARLIC INFUSED SALT
INGREDIENTS
- 1 cup Kosher salt
- About 1/4 cup of garlic cloves, usually about 1 1/2 heads of garlic
INSTRUCTIONS
- Peel the garlic cloves and place in a food processor. Add the salt, preferably Kosher salt. The iodine and other minerals in table salt or celtic sea salt can cause the garlic to discolor.
- Process the garlic and salt mixture for about 20 seconds until it reaches the consistency of sand.
- Spread the mixture on parchment or a silicone baking mat and place on a baking sheet.
- Bake in a 180-degree oven for about an hour, until the mixture is dry and crisp. Use the oven heat to dry out the garlic slowly, but avoid browning it.
- Add the garlic salt back into the food processor and pulse it a few times until it resembles the texture of cornmeal.
- Store the mixture in an air-tight jar in a cool, dry place. Label and date your garlic salt, and discard any remainder after three months.
DRESS IT UP
For a tasty and eye-catching variation, try adding dried parsley or oregano to the food processor along with your garlic and salt.
For a peppery version, grind up black peppercorns in a coffee grinder or your pepper grinder; they’re usually too small and hard to grind finely in a food processor. Add the ground peppercorns to your garlic and salt mixture in the food processor and process. You might find that the added pepper allows you to reduce the salt in the mixture and still retain a delicious, flavorful mixture.
Use this to season avocado toast, soups, potatoes, rice, or sprinkle it over cooked vegetables. This is great in anything you would put garlic and salt in.
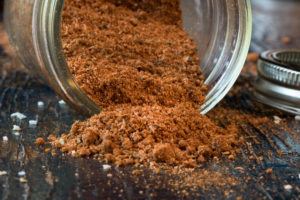
Best BBQ Meat Rub
INGREDIENTS
- 1/3 cup packed brown sugar
- 1 tsp chili powder
- 2 tsp cumin
- 2 1/2 tbsp smoked paprika
- 1 tbsp garlic powder
- 1 tbsp onion powder
- 1 tbsp Salt
- 1 tbsp Black pepper
- 1 tbsp Cayenne pepper
INSTRUCTIONS
- Pour all ingredients into a jar. Seal the jar and shake until all spices are well combined.
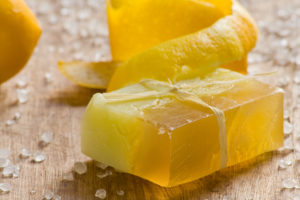
Zesty Lemon Soap Recipe via Beauty Crafter
INGREDIENTS
- 6 ounces of melt and pour glycerin soap base, cut into small chunks
- zest of one lemon
- 1/4 tsp lemon essential oil
- Soap molds
INSTRUCTIONS
- Place the glycerin soap and lemon zest in a microwave safe container preferably a large glass measuring cup. Microwave for 30 seconds, then check and stir with a chopstick or spoon. Remove when soap is just melted or very close to fully melted and stir.
- Allow to cool while stirring. This helps the essential oils not dissipate off to quickly while being mixed in, but don’t be too fussy about it. Some will dissipate, but much will remain and the flashpoint of lemon essential oil is lower than the melt point of the soap base so you can’t stop it completely. Fragrance oils generally are less likely to waft away, but don’t have the benefits of essential oil either.
- Pour the soap mixture into the silicone molds and set aside to cool.
- Once full cool, pop the soap bars out. Be sure to store them in an airtight container or package after to avoid losing the lemon scent.
Dip-Dyed Candles via Martha Stewart

MATERIALS
- White pillar candles, assorted sizes
- Bleached beeswax beads (for melting)
- Double boiler or slow cooker
- Vegetable peeler or knifeCrayons, in various colors
- Wooden spoon
- Taper candle
- Ceramic plate or baking sheet
- Place wax beads in a double boiler or a slow cooker with a nonstick insert, filling about a quarter of the way. Melt wax, adding more chips for a higher wax line.
- Use vegetable peeler or knife to shave bits of crayon into wax (totaling about a quarter of a crayon). Stir to blend. Let any bubbles settle, and dip a taper candle into wax to test the color (once beeswax dries, it can be broken off, so you can use the taper for the next batch). Add more shavings for darker color. Remove wax from heat.
- With a slow, even motion, dip base of 1 pillar candle to the desired height. Hold candle in melted wax for 5 to 10 seconds; remove, and set candle, tinted end down, on plate or baking sheet to dry (once wax hardens, the candle should be easy to remove). If making multiple candles, return wax to heat as needed to maintain proper consistency.
- Let leftover wax solidify, and it will pop out easily. (Wash the pot or insert well afterward to use it again for food.)
Let us know if you have any questions and how your homemade gifts went over with your friends and family. Wishing you the best Christmas!

You’re invited to join us for our Christmas services as we celebrate Advent and Christmas. Learn more at https://eastwoodtulsa.org/christmas-at-eastwood